Showing posts with label Daisy Nail Lacquer. Show all posts

Tuesday, August 21, 2012

RAWR Shop- MOAR Neon Tribals!


Hello my beautifuls! It's TUESDAY!!
That means 3 more days, then it's the weekend....but who's counting really?

Today's post features the very lovely Dani @ Call It Beauty.
It's always a blast having her here because she comes up with the best ideas...also we goof off...a lot lol
I swear people would think we're "special" if they saw us together in REAL LIFE
But "special" is just another word for AWESOME! So I'll take it. 

We used TONS of colours:

As you can see....I need more Color Clubs!
So I've decided that we are going to photo-bomb this mani...because I am so in LURVE!
In fact, I like it so much, I made it my new banner :D


She always takes awesome pictures of me doing her NAYOS!


...I could do this all day...

Anyhoo, that's all for me today! 
Have a FANTABULOUS day, you sexy beasts!

Thursday, July 19, 2012

RAWR Shop- Multi Neon Tips "Hee-Hee"


Happy Thursday, loverlies.
Today at the RAWR Shop, we have a multi-tip mani. Dani always come up with the best ideas! 
Dani named this one "Hee-Hee" because that's all she does when she looks at them! HAHA

There are tons of looks you can achieve with neon and grey/beige. 
Check out DrinkCitra's awesome manis here, here, and here.

To achieve this look, we used the following polishes:

Daisy Nail Lacquer- Sun! Glasses Please.
OPI- Skull & Glossbones
Color Club- Warhol

How come there's sight of any neon pink in this mani? Well....here it is!!


We painted the underside a neon pink. Dani says it makes her happy with she sees the pink :)
YAY!


Have a great day my loves!!

Wednesday, July 4, 2012

Versace Print Inspired Mani


Hello lovers and friends!! HAPPY HUMP DAY!!
Today I have something real colourful for you!

I've been doing some research on what design I can pull off on Google, and came upon these pictures:

(Source: Google)

Look at these gorgeous scarves!!!!! So these came about!

So to make this design happen, I used the following:


Daisy Nail Lacquer- SUN-Glasses, Please!
Color Club- Age of Aquarius
White, Black and Gold Acrylic paint

I'm really pleased with the way these turned out! But I get it, it screams for attention.
SO it might not be for everyone to wear on a regular day.


I was so proud of these, I submitted them to Elle Canada along with some of my other designs!
I would appreciate your love here!! 
:)

----------------------------------------------------------------------------------

....NOW onto MOAR exciting news!!
We have officially hit the 50 followers mark!!!!!!!!


*cue fireworks*
Thank you so much for your support, guys!! Without you I'll just be talking to myself like a crazy person.
I really appreciate it!
<3

Monday, May 28, 2012

Neon Leopards


Hello my love-loves! 
If you've been following this blog, you'd know what today is.....it's MONDAY!!!!

*haha!! i kid!!*

I'm going to be a big girl and do people's nails today at a concert!!
But of course, I gotta figure out my own nails first right? right.
So I combined all my favourites so far this summer: Gradients, Neon brights, and Leopard prints


Exclusive 5 stars- Pink Glitter
Daisy Nail Lacque- Sun Glasses, Please!
Color Club- Wham! Pow!
OPI- DS Magic
Magical Nail art polish- Gold Glitter

I'm not sure if I'm over excited/nervous, or the camera just couldn't handle the awesomeness...most of my pictures for this mani turned out blurry...lol


I used Sun Glasses, Please, Wham! Pow!, and Pink Glitter to create the gradient. Then I drew on the leopard prints, and filled it with Gold Glitter, and DS Magic.

Speaking of shiny... look at my cards!!!!! =D


So wish me luck!! 
Stay tuned for my first nail RAWR-ing experience!


Thursday, May 24, 2012

Tribal Frenzy

Good morning, lovers and friends!
Who doesn't like a little randomness in their lives? Well....for me...I like A LOT of randomness.

That is probably why my nails look like this all the time-->
yea....random....

What was involved?
Rimmel London- Black Satin
Daisy Nail Lacquer- Sun Glasses, Please!
Color Club- Wild Child, Wham! Pow!, Age of Aquarius

You should see some of these designs on the business card I'm debuting tomorrow (!!!)

Excitement!


Friday, May 4, 2012

Laser Beam Nails


LASER BEAM!!!

*wom wom wom*
Once again, we arrive at the best day of the work week....FRIDAY!!
Happy Friday, everybody :)
Today I have a pretty simple to do mani!

Remember back in the days, we would layer multiple bright colours on paper and then cover it with black crayons....and then scratch our drawings on?


(Image: Google)

This mani kind of also reminds me of that!

To achieve this look you will need the following:
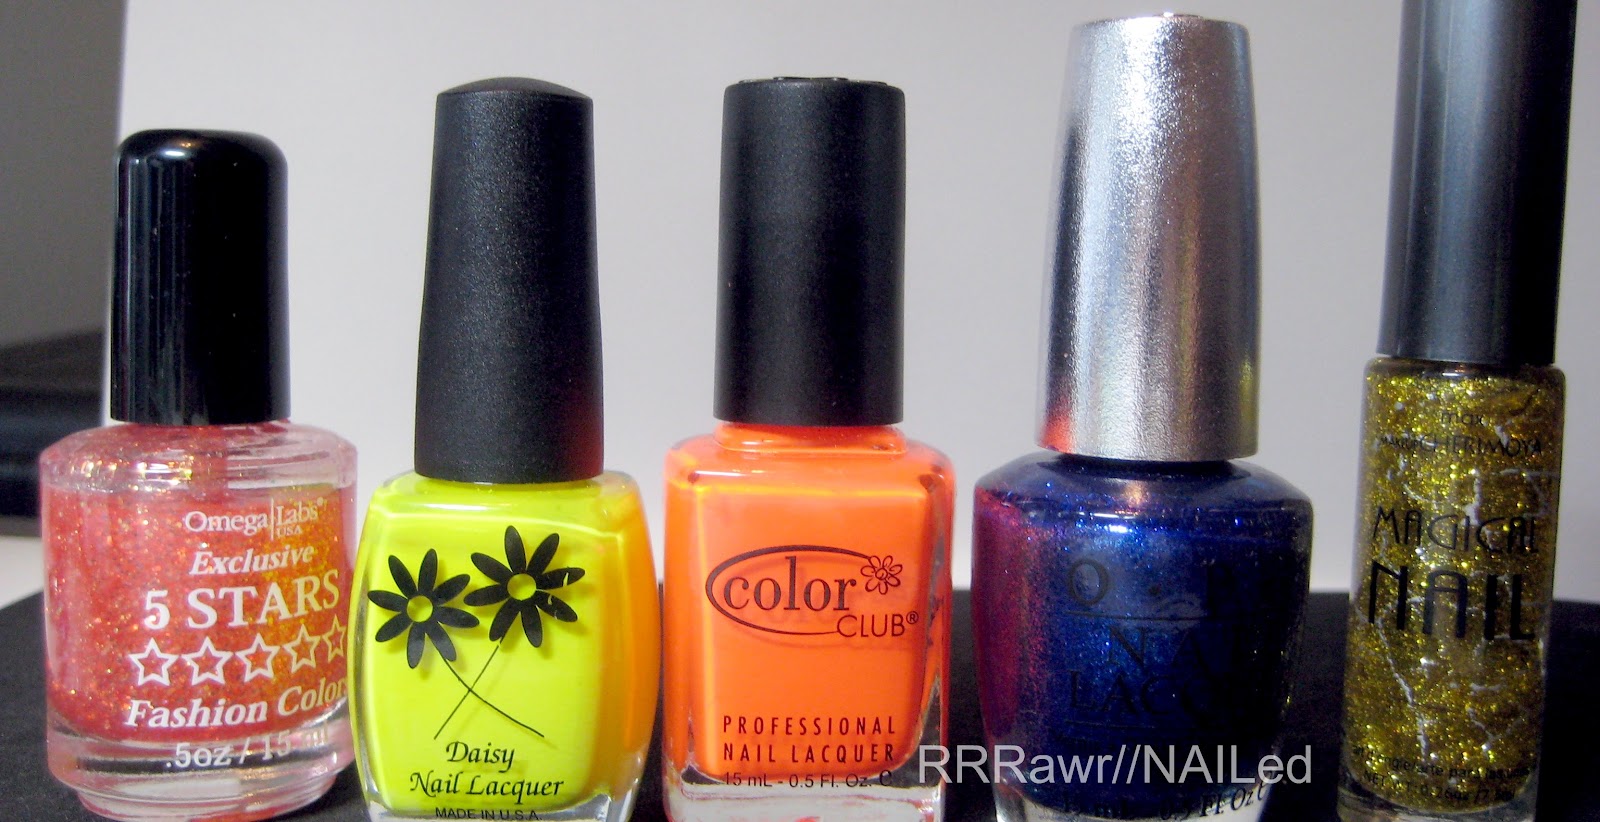
Polishes of your choice to create the gradient, and a colour over top (I used black)


Daisy Nail Lacquer- SUN Glasses, please!, Color Club-Wild Child, Rimmel London- Black Satin, China Glaze- Fairy Dust for top coat over the black only


Striping Tape, and a sponge.
I bought the striping tape off Ebay, and used the sponge to create the gradient.

Step 1: Create gradient.

Now, if you're a newb like me, the thought of achieving a gradient makes me want to cry...
But do not fear! There are a few tutorials online, and here are some great one to follow to get your feet wet:
Now I have to admit, this method did not work for me in this case...might be the consistency of Wild Child...

This is what I usually do with my gradient nails:

Also check out how Dani @ Call It Beauty achieved her's: Here


Step 2: Tape off the laser beams!!

This is pretty self explanatory. You can do pretty much anything and have it look great! 

Make sure you wait until your gradient is dried to apply tape!

I bought the tape immediately after I saw this mani on Sarah from Chalkboard Nails!! Check out her post: HERE!


Step 3: Paint it black!!

This step is exactly that....a black coat overtop.
I added Fairy Dust because.... everyone needs a little shablam in their lives...

Be VERY patient and wait for this coat to completely dry!


Step 4: peel and top coat!

Make sure you wait until they dry! Very important.
Otherwise all your hard work will go to waste!


Then, clean up all the excess polish on the side...and VOILA!!


Sorry for the blurriness....I clearly require better photography skills.... -__-

I just love the way it looks....and I can't stop staring at them today....LOL

***************************************************

Now...about Fairy Dust....
if you don't have it........why don't you have it??


Please, make your heart happy, and buy yourself one :D


****************************************************

Hope you enjoyed this as much as I did making it!
Have a beautiful weekend, everybody!

<3

Thursday, May 3, 2012

Heaven...

Happy Thursday, lovers and friends!

Yesterday I visited Secret Nail & Beauty Supplyit's a beauty supply store
... and my life is forever changed ...
Where have I been all this time? I don't think I'll ever leave this place without buying anything.

First I saw THIS:

...a wall display full of China Glaze... *freak out* 
I CAN HAZ?!

Then within minutes, these things magically appeared in my basket...
I don't know how they got there....I swear.... 


Here are my purchases from yesterday:

China Glaze- Fairy Dust (!!), Color Club- Wild Child, Daisy Nail Polish- (I forgot the name), and SUN Glasses, Please! and a CND Super Matte Top coat.
Not in the picture: Pink Polish remover, and a clear nail wheel

Well of course I couldn't wait to play with them....
So I swatched some of them along with the polishes I bought on Monday on my wheel...

I'll get more in depth with each and every one of them eventually...but I wanted to show you first!!
LOOK HOW PRETTY!!

CG- Fairy Dust over Black...instant HOLO!


....and then this happened....


This guy looks like a pokemon or something...

My new mascot! I shall name him...
George-Bob