Showing posts with label OPI. Show all posts

Thursday, January 16, 2014

OPI Push and Shove


Hello my loves!!!
Today I have something VERY special to show you.
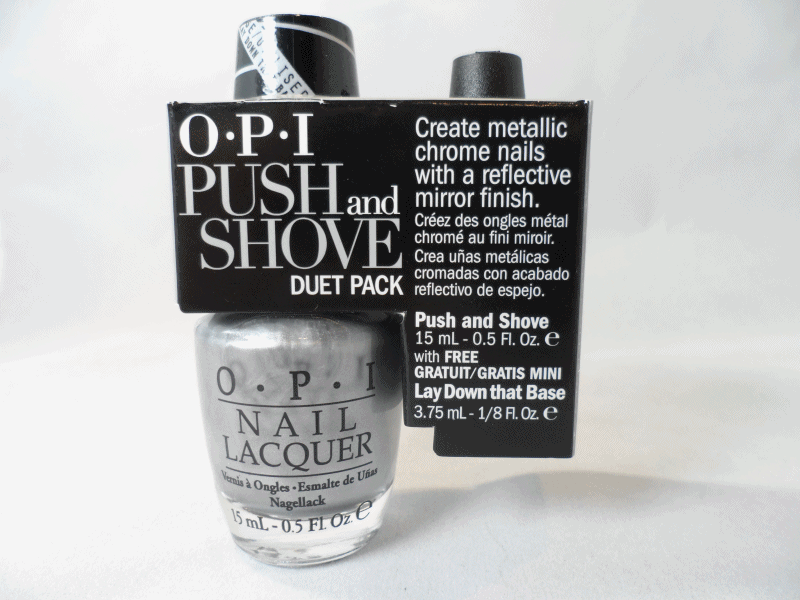
This is OPI's Push and Shove from the latest Gwen Stefani collection.

As the package states, it creates a metallic chrome effect with a mirror finish...I knew I HAD to have it when I saw the "mirror" part! 
The package comes with a full size bottle as well as a free mini bottle of "Lay Down that Base"
It also says NOT to apply topcoat to this polish, and that it's suppose to only last one day.

WELL...this sparked ALL KINDS of questions in my head.
-WHY do you have to use this base?
- do I HAVE to use this base?
-WHAT happens when I run out of that mini bottle?
-WHY can't I apply topcoat?
-does it really only last one day?

WONDER NO MORE FRIENDS!
After some extensive research (by extensive I really mean a lot of apply, removal, reapply), I have put together a little presentation. This is like...a science project...why can't science be like this in school?!

First off, the best result I got was from after a layer of... 

GEL TOP COAT AS BASE
Gel Top Coat| &S- 2 coats | Lay Down that Base- NONE

SUPER WIN!!!!
I LOVE THIS I LOVE THIS I LOVE THIS I LOVE THIS!
7350920324938293 THUMBS UP!


Look how chromey and mirrorey it looks under different lighting!!!!! 


It looks even more reflective in person, and be prepared to be distracted AT ALL TIMES.
I can almost see my camera in some of these pictures...how awesome is that?!
I feel like a walking stainless steel fridge!!! WHOOT!!!!

Buffed w/o Base
P&S- 2 coats | Lay Down that Base- NONE

So after that I figured that this polish requires a SMOOTH surface, because you can pretty much see all the flaws and bumps with it on. Then I buffed my nails with a buffer to see if it would adhere to a matte surface.


As you can see. It's not pretty. It did NOT have a mirror finish...and you can clearly see all the buff marks.
I've actually have mixed results with this...the other time I applied it, it had sort of a "crackle" effect...needless to say, this is not the most ideal application. Therefore not recommended!

Buffed WITH Lay Down that Base
P&S- 2 coats | Lay Down that Base- 1 coat

I then removed the existing polish and applied Lay Down that Base to my buffed nails. It is crucial that you wait until this base coat is completely dry to move on to the next step!


Not bad right? Except it's still not what I would really consider a "mirror" effect. As you can STILL spot buff marks upon closer inspection.


With a different BASE COAT
P&S- 1 coat | Seche Clear Basecoat- 1 coat

Then you're probably all wondering...so what happens if I use a different base coat than the one provided?


NOPE, NOPE and hmm....let me think....
NOPE.
(I'm actually getting kind of dizzy from this gif...)

SECHE VITE as TOP COAT
P&S- 2 coats | Lay Down that Base- 1 coat | Seche Vite Top coat- 1 coat

Let's face it...the more someone says NOT to do something, the more you want to do it. 
So here I go...and in fact, the package was right....it dulls the shine, and no longer has a mirror effect.
So sorry guys, this one's a doozy.


OKAY! So at this point I was pretty much ugly crying because Lay Down the Base is a REALLY SMALL BOTTLE! and I see myself wearing this A LOT, because SHINY!
Then it dawned on me....

Seche Vite Top coat as BASE COAT
Seche Vite as base- 1 coat | P&S- 2 coats

Again...be sure to wait until the base coat is COMPLETELY dried to move on to P&S
AH-HA!!!!!!!!


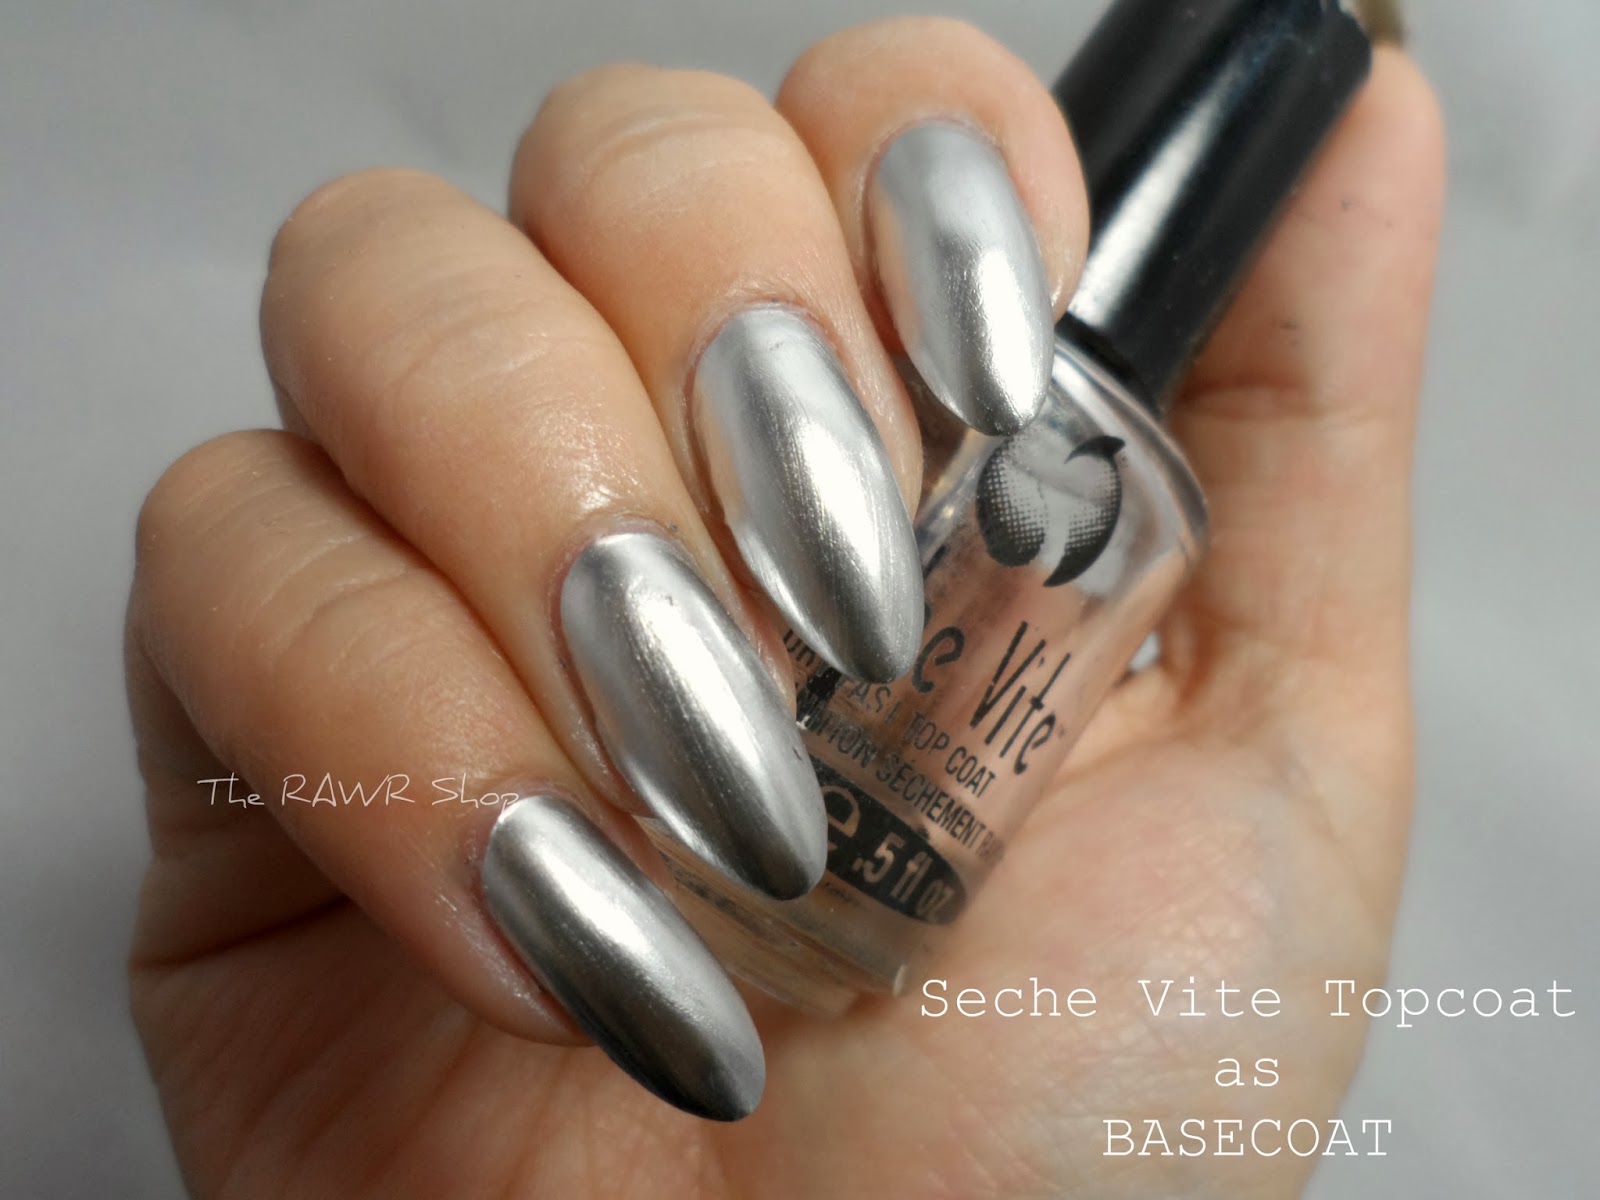
This is almost the same shiny mani as the gel coat!!! The conclusion is that this polish requires an ULTRA glossy smooth base for the effect to take place. and so, VOILA! Problem solved. Use Seche Vite as base!


And of course, I couldn't just let you go without some nail art...


A few things....
- Make sure each layer is dried before moving on to the next
- This polish dries fast! So if you're doing nail art with it, work fast!
- Minimal tip wear is present after a whole day of typing
-  Practice your brush strokes...as it shows in your final product

Well that's all for me today...if I left out anything you would like to know about this polish, feel free to leave a comment...or send me a love mail!

Hope you enjoyed what I put together for you today.
HAVE THE MOST WONDERFUL DAY, LOVERS!

Thursday, May 2, 2013

May Flowers


HEY GANG!
I have a short post for you today!

We've moved onto the acrylic portion of the course in nail school...and I thought I'd try my hand at some 3D acrylic art! Starting with some May flowers....after April showers (get it? ha?)

I incorporated gold chains and studs into each tip to tie everything together.
This gradient is so pretty, I almost didn't want to do anything with it!


But I'm glad I did....
^_^

Did you know...
That there is only ONE MONTH LEFT until I become a CERTIFIED NAIL TECHNICIAN?
I am beyond excited.

That's all for me today!

Have a SPLENDID day, friends!

Thursday, March 28, 2013

Vacation Time!


I'll give you three guesses on where I'm going.....
^_^

They decided to let me out of Canada and go to LA for a stagette this weekend! lol
(Warning: Winnie on the loose!!)
Since I can never make up my mind on what to do for vacation nails....I figured I'd just put everything on.
This is Random Winnie at its finest.


.....and you know what? I love every single one of them!
I thought the LA thing was borderline corny....but after I put on the roses, they look like they belong!
Get it? Vancouver to LA? HA? Ok....I'll stop.


Really not much more to say about the craziness here, besides...I really hope my nails don't break while I'm there....because I would cry....really loud....


Do I have any lovers in LA?
Wanna hang out? LET'S!!!!!!!!!!!!!!!!!!!

That's all for me today!
Have a fantastic Easter weekend! 

Thursday, March 21, 2013

Vintage Roses


Hello my loves!

I don't know what it is with me lately...I've been obsessed with roses...
Guess it's one of those things that when you finally learned how to do it, you just want to do it over and over again?

I picked up OPI's My Vampire is Buff at the SPA Show back in February...
and I thought it'd be a great base to showcase these vintage roses.
The formula of this bottle is so....fussy....? I had a really hard time reaching full coverage with it..
Any of you guys experiencing the same thing?


I painted on every detail (including the black lines) with acrylic paint and used KISS studs on my accent finger.
2 Hours into the completion of this mani, my usual self kicked in and decided that it needed MOAR....
so I started playing around with some things...

First- I added Butter London's Matte topcoat....and it made things EVEN MOAR vintage!
*score*
Then I added some roses, redid one finger and VOILA! RANDOM!
You should be proud to know that I managed to leave TWO fingers alone....


I like them better now that they're more random...
LIKE ME!


Avocado!


Have a great day, friends!

Tuesday, March 12, 2013

Playing in the Liquid Sand


GET IT? HA?

...Anyhow...
Hello my lovelies! Today I have something pretty to show you!
I've had these liquid sands for a while now...and I've FINALLY got around to playing with them...
-____-
What took me so long? I don't know...

OPI Liquid Sand is a textured polish packed with glitter that dries to a matte and sandy finish.
There are quite a few brands coming out with the same concept right now...though I have yet to try them.

For this project, I used the following:

Left to right:
 Stay the Night, Get Your Number, Can't Let Go
Ring finger: OPI...Eurso Euro and some KISS studs


For the gradient effect with the liquid sand, I had to dab on Get Your Number and Can't Let Go to make them more visible. This resulted in less mess to clean up, so I was quite happy with it.

OPI Eurso Euro is such a pretty blue...I can't get enough of it....
I do, however, think I got a dud bottle...because it smells like skunk? Why is that???
Anyway, I am in absolute LOVE with my ring fingers...


The sparkles...LOOK AT THE SPARKLES!
They make my heart so very happy.

Overall, I was pretty pleased with the application of all Liquid Sands.
The only complaint I have is the dry time...
I've been spoiled with Seche Vite top coat that I forgot how long it takes for polishes to dry without them.
Patience has never been one of my virtues...But I suppose for the prettiness, I will have to embrace the wait
:D

Anyhoo, that's all for me today!
Hope you enjoyed this as much as I did making it!

Have a wonderful day, beautiful people!

Thursday, February 7, 2013

RAWR Shop- Weekend Getaway


Why hello my wonderful lovers. 
Wow, 2 posts in one week! I've really outdone myself this time (not)

Today I have a RAWR SHOP post for you.
Remember Kira? Of course you do! She came in for a rebalance on her gel set...
So naturally we had to put something even MOAR epic on her this time.

(Photo Credit: Hair By Katie Rose <-- she's really awesome)

Since she's going away for the weekend, we decided to sharpen her claws and match them to her newly purchased Betsy Johnson bag...and WOWZA, what a great idea that was.


Her nails literally blends in with her bag!!
When she first proposed the idea, I was petrified...because YOU GUYS! I've NEVER done roses on nails before!!
So after some research, thanks to the power of the interwebz, we decided to just go with it.


Thank goodness they turned out lovely!
I used Color Club's Black Is Black and acrylic paint for all fingers except for one! The ring finger is OPI's Liquid Sand in The Impossible. It's impossible NOT to love this polish, I tell ya (see what I did there?)

During this session, we've discovered the following:
Boys are dumb
We *squee* at the same things
She's going to have TONS of fun this weekend
and I'm jealous


:) 
That's all for me today! Hope you enjoyed this mani....because I CAN'T STOP LOOKING AT THEM.
Have a good trip Kira!!

Guess what?
...
...
...
Tomorrow's FRIDAY!!

Wednesday, February 6, 2013

Featured: Valentine's Mani


Hey lovers! How's everyone doing on this fiiiiiiiine Wednesday morning?
If you've been stalking me for a while, you'd know that I'm usually not one for festive designs...
But today I have a....not so typical....Valentine's Day mani for you!

I'm pleased to also share that this mani was featured in an article on Glo.MSN.com
(see full article: here)


Now, on to this mani...
I started this mani with absolutely NO idea what I was going to end up with....I find that at times I come up with the MOST random things when that happens. You guys, I LOVE RANDOM THINGS!!
Now that I look at it some more, I figured out what it kind of looks like: INSA!!
This guy's work is amazing, so make sure you go and check out his website.


To achieve the marbled background, I used a kitchen sponge and dabbed on the following :
China Glaze- Flip Flop Fantasy, Flying Dragon, Fairy Dust, Aquadelic and OPI- DS Magic

I really love how the colours turned out!!
I then added outlines of hearts and the details around it with a very thin brush using black acrylic paint.
The results was heart pumpingly good, and I'm extremely happy with the way everything worked out!


Wanna see my other hand? OK!
It's really blurry, so I won't blind you with a huge picture...haha!
I like both! ^_^

YAY for more features in articles!
YAY for Schmalentine's!
YAY for all you good looking peoples (yes you!)
Hope you enjoyed this mani as much as I did.

Have a wonderful day, peeps!

Friday, February 1, 2013

RAWR Shop- Sponge-Mania


Well hello friends! Hope you are ALL doing fantastic! It's been a week since we last talked...felt like years :(
Today at The RAWR Shop I have prepared something "spring-like".
Since school started, I haven't really been able to do much nail art...but yesterday, the beautiful Dani @ Call It Beauty and I FINALLY got to see each other and make magic.


For this mani, we used the following:

China Glaze- Aquadelic, Flip Flop Fantasy, Glistening Snow
Zoya- Zuza, Ginessa
OPI- DS Magic
Rimmel London- Wild Orchid
Silver Hexa-Glitters

 (I know...so many)

I'm experiencing a little bit of blog identity crisis...
Not sure if I should stick with a black background or white...I must say though, the colours did come through more vibrantly with a white background...
So I guess it all depends on the mani.

I'm still undecided...help?


We were going to put more designs over top, but Dani liked the effect so much, she didn't want to cover them up.
By the By!! This design is on top of a gel set my friend and I did for our final exam!

Speaking of which...
I'M DONE LEVEL ONE of NAIL SCHOOL!!!!!!
...and you will be pleased to know that I passed with 98.66% in theory, and 100% in practical
That means in 5 months, I'll be a Certified Nail Technician!
*excite*

in the meantime...I'll just be this...
Who am I kidding, I'm gunna be FOREVER THIS!
...ngehehe...


Have a SUPER weekend, folks!

Thursday, October 18, 2012

Swatched- OPI Goldeneye


Hello beautiful peoples!
Hope you're all having a great Thursday. One more day 'til the weekend is here!
...so hang in there!

Today I have a swatch of OPI- Goldeneye from the Skyfall collection.
I never thought I was much of an OPI girl, but it seems that my collection of OPI is getting bigger and bigger!

I first saw a swatch of Goldeneye by Mary @ Swatch and Learn...and I knew that I needed it in my life!
Goldeneye has a clear base, and is packed with a generous amount of gold foil specks, mixed with some gold sparkles. It takes about 3 coats to completely cover the surface. 
To my surprise, the formula was not as thick as I thought it would be, which is AWESOME!
Because nobody likes a goopy polish...


It is very attention grabbing, and the way it reflects under the light is just stunning.
I can see MANY nail art designs to be done with this one!!

Here you can really see the foil effect!


So what's the verdict? 
LOVE.

and now I want the rest of the collection....
Hope you liked today's swatch! Will you going out to a bottle of your own?

Have a nice day, lovelies!

Friday, September 28, 2012

Swatched- OPI's Every Month Is Oktoberfest


HAPPY FRIDAY!!
Today I have a gorgeous swatch of  OPI's Every Month Is Oktoberfest from their German Collection.
I don't own too many OPI polishes, but when I saw this, I knew I just GOT to have it!

I'm sure you've seen gazillions of swatches out there on this polish already...
but it's so beautiful, I had to blog about it....lol


Every Month Is Oktoberfest is a rich, vampy polish that makes my Autumn loving heart sing.
It has a royal blue/purple base, packed with an abundance amount of burgundy shimmers.
Don't believe me? Look!


I was thoroughly amused by the fact how the blue comes out when the light shines through.
GUH...I just can't get enough of this colour!!


Well played, OPI!! I'm a fan...you win at life.
But of course, I couldn't just swatch a polish and not do anything with it...right? Right!
I went with the vampiness of this polish, and ended up with this:


Do you have a favourite from the Germany Collection?
Hope you enjoyed this swatch! 

Have an AWESOME weekend, my loves!